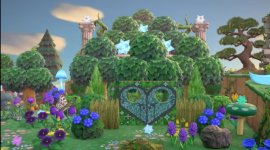
That's not my island, and I don't know if you still need this info, but I have a general idea of how it was done. I don't know the custom codes for the cut-outs (the gate), but it's done with trees, terraforming, and Ruined decorated pillars for the stars/Nova Lights (Celeste DIY) if you care about those.
Notes: To recreate the whole thing, the bottom 3 trees need to be on the bottom level of your island (same level as the beach). The fourth level is for decorative purposes only, you can't climb/put things up that high. You can also start this in front of an existing second-level cliff, so long as you have room for the trees/pillar on that level and can put a third level behind that. It's easiest done by eating fruit and digging up existing trees, but planting saplings could work too. I also recommend bringing extra fruit (whichever one is your native fruit since it has little resell value) for the sake of trial and error.
1. Plant/move 3 trees close together in front. If growing them from saplings, you may have to have them farther apart at first. The center tree is a bit more in front of the other two as opposed to all 3 being in a direct row. Place your pillars/Nova Lights just behind the gaps in the bottom row trees.
2. Go into Construction Mode and build a cliff directly behind your pillars if you didn't start with one.
3. Climb up there and plant/move 2 trees in a line as close to the cliff edge as you can so that they fill in the gaps of the trees below. Place the pillar/Nova Light in the gap just behind the trees.
4. Build the last cliff just behind your pillars if necessary.
5. Climb up and plant a tree as close to the cliff as possible so that it's between the two below, and you're done!