


Note: If you're looking for something specific and having trouble finding it, try Ctrl+f (Windows), Command+f (Mac) and search for a word related to your issue.
The pinnacle of individuality beyond usernames is the signature. The general rules about signatures are found on the Bell Tree Rules and Guidelines page but for a more in depth look at the signature rule, use this guide! What constitutes as a signature can be quite confusing at times but I'm here to show you everything you need to know about signatures and how to prevent the dreaded "signature warning"! So let's begin!
_______________________________________________________________________________
What does signature mean to TBT?
This includes ALL Spoilers, text, AND Images you use in the signature. Signatures are NOT solely the image of your villagers so keep this in mind when editing your signature.
_______________________________________________________________________________
What is the maximum height for signatures?
 _______________________________________________________________________________
How can I tell if MY signature is in line with the rules?
PC users:
MAC users:
Eyeball method:
There are many other ways to check pixel height but now that you know a few, you can have a better idea of where your signature stands in height.
_______________________________________________________________________________
Things to Remember
_______________________________________________________________________________
FAQ
Quite a few of you have asked how to do specific things relating to images themselves. Threads pop up in the HQ all the time that ask questions such as: How do I use an animated gif? Or, How do I make everything centered? Look no more, here, I’m going to explain how to do specific signature-related things that you may find helpful.
Q: How do I center my entire signature?
A: First off, you’re going to use our lovely BB code for it. If you’ve ever used advanced mode when posting, you’ll notice it puts a bit of code into your post. It’s the exact same for signatures, except there’s no handy-dandy tool that just lets you press a button to do it. The BB code for center is:
Q: How do I make an animated gif as my signature?
A: First you’ll have to have an animated gif available to use. Usually it’ll be saved to your computer at this point, or you’ll be given a link to save and upload for yourself. You can’t upload your signature with our tools here, so you’ll have to use an outside source. Usually I recommend using an outside upload tool anyway so that you can reference it later in an album, even if you’re not using it. There are a number of websites that will allow for it, and creating an account can save your pictures for years.
Imgur.com
Photobucket.com
NOTE: Tinypic is known to occasionally swap out your images so we highly recommend using one of the above sites instead.
These are the big ones. Remember, if you don’t create an account, usually your image will only be available for a certain amount of time, so remember that you have to use one or it may be deleted while you’re still using it (oh no!)
After you upload the image, you can copy and paste the direct link into image tags, which I’ll show you below. You can preview your signature to make sure it works, and go further into stylizing your signature with text, or even spoilers to show off some of the things you’re most proud of. Please keep in mind, signature size rules include all text, images, and closed spoilers.
Q: How do I take a screenshot or crop an image?
A: There’s many ways to do this. If you’re trying to take just a screenshot, refer to the below guide.
Windows: To take a screen shot you’re going to locate print screen button on your keyboard. When you’ve pressed it with the image on the screen that you’re trying to take a picture of, you can open paint, press control+V or Edit>Paste. It will paste your entire screen in the document. You can use the select tool (the dotted line box) and you can select “Crop” from one of the menus.
If you’re using Windows 7, you’ll have a snipping tool available from the Start Menu. (HINT: Type it in the search box) Select it, and if you feel like you’re going to be taking many screenshots, pin it to your task bar. With this tool you can clip a selected portion of your screen and save just that as an image file directly to your computer for uploading on an image sharing website.
Mac: Taking a screenshot on the Mac is much easier. On your keyboard, locate Shift+Command+3. This will take a screenshot of your entire, visible screen. You can again, edit this down in an image program, or online. Mac does not have a native program like paint, but your screenshot will save to your desktop for easy uploading.
Alternatively, use Shift+Command+4 to screenshot a specific selected region on your screen, which will also save to your desktop for easy uploading.
On many image sharing websites, you can edit your image by resizing it and cropping it. Be advised, gifs can NOT be edited through those websites. Save your image to your computer, and use:
http://www.online-image-editor.com/
You can edit down the size of your gifs and pictures at this website, and this also works for avatars. This is the website that I use to make signatures and edit down my avatar size to the 100x100 standard, and KB image size that TBT requires.
Q: How do I make a signature or an avatar?
A: With all of the combined methods above you can easily create a simple image for your signature. Otherwise, you’ll need an image editing program like Gimp or Photoshop to play with layers, effects, and text. This is very advanced, and if you would like to get into this kind of signature creation, then I suggest a guide. I will not be making one. This will have to be done ON YOUR OWN.
Alternatively, there are a number of wonderful “GFX” (graphics) designers on this website that will either charge you some TBT bells, ACNL bells, or sometimes even do it for nothing at all. You can find these wonderful sellers in the TBT Marketplace, or the Museum. Please be advised, some people will charge, and they do take a while or have orders that need to be placed before getting to you. Find someone who you like the style of, make a request only after reading their rules. These designers are usually seasoned, and will create something with an image you like, or with a style you enjoy. They’ll give you the image to save and host yourself. Never rely on someone to host your image for you, it’s rude and takes up their space.
This applies as well to avatars.
Q: How do I make a rotating/cycling/changing signature?
A: A couple of hosts will give you the BB code to use multiple signatures that change when the page is refreshed. The one that I’ve seen most used is below:
http://signavatar.com/
Q: Can I make a rotating avatar?
A: Rotating avatars are not supported. There are no plans to implement this either. Please do not ask about this.
Q: How do I make a transparent background on an image for a signature or icon?
A: Most of the time, this is where an image editing program like Gimp or Photoshop is needed. You will need to cut the parts of the image away that you don't want and leave it on a transparent layer, and then save it in a format that supports transparency. The most used ones are GIF and PNG.
If you don't know how to do this, the online image editor linked earlier has a transparency tool that will cut everything of the same color away. For example, if you have a picture of a character on a white background, you can use the transparency tool to cut away all the white in one click, and save it out like that to be uploaded to your image host of choice.
Other than that, you may have to ask a GFX editor on the site to do it for you, but be aware they have the right to reject or charge you for the trouble. If the specified item you want cut out is on a "busy" background, they may have to spend a bit of time to get it to look good for you. Be respectful, and always remember that this is work that they're doing with their time!
Q: How do I get an image editing program? I don't have one!
A: You have a couple of choices here. Gimp is one of the preferred programs because it's free. There's no trial period, and you can jump in with some tutorials and get right down to work. Many people find Gimp confusing though, so remember that searching "Gimp Tutorial" on Google may be worth the time.
http://www.gimp.org/
There's also Adobe Photoshop. You can get a thirty day trial of the program from their website, but afterwards you will have to pay to use it. Adobe programs are highly expensive, because they are known for professional quality and generally easier to use with more options for brush customizations. Keep in mind, we will not help you get this program for free.
http://www.adobe.com/
Q: This is too hard! I just want to make a signature!
A: If you find this difficult, I highly suggest paying someone to make a signature for you.
Q: Where can I find villager sprites for my signature?
A: In this one situation, I'm not going to hand you a link. I would like for you to use google or ask others that have this who they got them from. There's a very good reason for this.
Anytime you use someone else's work for your signature, you are using their labor in your signature. Even if you paid for it here, you need to use a SOURCE in your signature! Some signatures will say the artists name on it, or some people have a nice "Thank you [artist]!" in small text. When it comes to using villager sprites, MOST artists want some sort of link back to their website, and you are REQUIRED to follow this rule for them!
So, I want YOU to find the source, and make sure you CREDIT the artist with a link back to their website, or their TBT profile under your signature. Alternatively, you can make your signature a CLICKABLE link IMAGE.

This is an example of what one looks like, and the code for it. The image is my signature, but the LINK leads back to IMGUR.com. You don't have to link back to your host, but if you didn't make it, you can always link back to that person's profile!
The pinnacle of individuality beyond usernames is the signature. The general rules about signatures are found on the Bell Tree Rules and Guidelines page but for a more in depth look at the signature rule, use this guide! What constitutes as a signature can be quite confusing at times but I'm here to show you everything you need to know about signatures and how to prevent the dreaded "signature warning"! So let's begin!
_______________________________________________________________________________
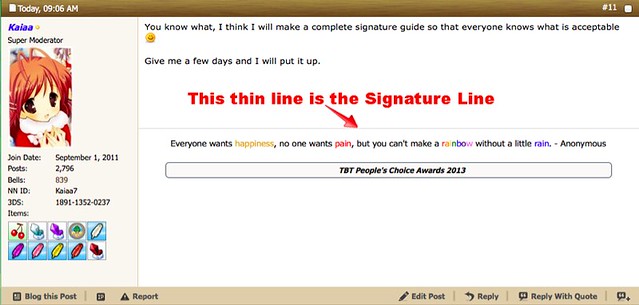
What does signature mean to TBT?
Signatures, as defined by the Bell Tree, include everything under the signature line.
This includes ALL Spoilers, text, AND Images you use in the signature. Signatures are NOT solely the image of your villagers so keep this in mind when editing your signature.
_______________________________________________________________________________
What is the maximum height for signatures?
The maximum height for a signature is 250 pixels in height.
How can I tell if MY signature is in line with the rules?
There are several ways you can check to see if your signature meets the rule.
PC users:
- Print Screen with your signature on the monitor
- Paste in Paint and crop to just your signature
- Find the Pixel length of the canvas
MAC users:
- Scroll to your signature
- Press and hold: Command +Shift +4 ----- This will bring up a cross with numbers, the numbers represent pixels. You need to focus on the BOTTOM number for HEIGHT.
- Move the cross to the top of your signature (about 1/2cm of white space down from the signature line.)
- Click and drag the cross to the bottom of your entire signature (about 1/2cm of white space after the last thing in your signature.)
- Do NOT stop at the picture. If you have text, multiple images, or spoilers, you must include them in the cross as well.
- If you are using Chrome, you may use the addon: "PageRuler". When using PageRuler you can measure the pixel dimensions of your signature.
- Measure from the top of your signature (about 1/2cm of white space down from the signature line) to the bottom of your entire signature (about 1/2cm of white space after the last thing in your signature.)
- Do NOT stop at the picture. If you have text, multiple images, or spoilers, you must include them in the cross as well.
Eyeball method:
- Look at your signature
- Now look at this box:
There are many other ways to check pixel height but now that you know a few, you can have a better idea of where your signature stands in height.
_______________________________________________________________________________
Things to Remember
- Anything in the prohibited section of the Rules must stay out of your signature
- Signatures include everything under the signature line
- Signatures are only to be 250 pixels in height at max
- Spoilers are your friend
- Click Here to see the Bell Tree Rules and Guidelines
- When in doubt, ask in this thread if your signature is within the rules
_______________________________________________________________________________
FAQ
Quite a few of you have asked how to do specific things relating to images themselves. Threads pop up in the HQ all the time that ask questions such as: How do I use an animated gif? Or, How do I make everything centered? Look no more, here, I’m going to explain how to do specific signature-related things that you may find helpful.
Q: How do I center my entire signature?
A: First off, you’re going to use our lovely BB code for it. If you’ve ever used advanced mode when posting, you’ll notice it puts a bit of code into your post. It’s the exact same for signatures, except there’s no handy-dandy tool that just lets you press a button to do it. The BB code for center is:
HTML:
[CENTER]Centered stuff[/CENTER]Q: How do I make an animated gif as my signature?
A: First you’ll have to have an animated gif available to use. Usually it’ll be saved to your computer at this point, or you’ll be given a link to save and upload for yourself. You can’t upload your signature with our tools here, so you’ll have to use an outside source. Usually I recommend using an outside upload tool anyway so that you can reference it later in an album, even if you’re not using it. There are a number of websites that will allow for it, and creating an account can save your pictures for years.
Imgur.com
Photobucket.com
NOTE: Tinypic is known to occasionally swap out your images so we highly recommend using one of the above sites instead.
These are the big ones. Remember, if you don’t create an account, usually your image will only be available for a certain amount of time, so remember that you have to use one or it may be deleted while you’re still using it (oh no!)
After you upload the image, you can copy and paste the direct link into image tags, which I’ll show you below. You can preview your signature to make sure it works, and go further into stylizing your signature with text, or even spoilers to show off some of the things you’re most proud of. Please keep in mind, signature size rules include all text, images, and closed spoilers.
HTML:
[img]Http://imgur.com/linklinklink.jpg[/img]Q: How do I take a screenshot or crop an image?
A: There’s many ways to do this. If you’re trying to take just a screenshot, refer to the below guide.
Windows: To take a screen shot you’re going to locate print screen button on your keyboard. When you’ve pressed it with the image on the screen that you’re trying to take a picture of, you can open paint, press control+V or Edit>Paste. It will paste your entire screen in the document. You can use the select tool (the dotted line box) and you can select “Crop” from one of the menus.
If you’re using Windows 7, you’ll have a snipping tool available from the Start Menu. (HINT: Type it in the search box) Select it, and if you feel like you’re going to be taking many screenshots, pin it to your task bar. With this tool you can clip a selected portion of your screen and save just that as an image file directly to your computer for uploading on an image sharing website.
Mac: Taking a screenshot on the Mac is much easier. On your keyboard, locate Shift+Command+3. This will take a screenshot of your entire, visible screen. You can again, edit this down in an image program, or online. Mac does not have a native program like paint, but your screenshot will save to your desktop for easy uploading.
Alternatively, use Shift+Command+4 to screenshot a specific selected region on your screen, which will also save to your desktop for easy uploading.
On many image sharing websites, you can edit your image by resizing it and cropping it. Be advised, gifs can NOT be edited through those websites. Save your image to your computer, and use:
http://www.online-image-editor.com/
You can edit down the size of your gifs and pictures at this website, and this also works for avatars. This is the website that I use to make signatures and edit down my avatar size to the 100x100 standard, and KB image size that TBT requires.
Q: How do I make a signature or an avatar?
A: With all of the combined methods above you can easily create a simple image for your signature. Otherwise, you’ll need an image editing program like Gimp or Photoshop to play with layers, effects, and text. This is very advanced, and if you would like to get into this kind of signature creation, then I suggest a guide. I will not be making one. This will have to be done ON YOUR OWN.
Alternatively, there are a number of wonderful “GFX” (graphics) designers on this website that will either charge you some TBT bells, ACNL bells, or sometimes even do it for nothing at all. You can find these wonderful sellers in the TBT Marketplace, or the Museum. Please be advised, some people will charge, and they do take a while or have orders that need to be placed before getting to you. Find someone who you like the style of, make a request only after reading their rules. These designers are usually seasoned, and will create something with an image you like, or with a style you enjoy. They’ll give you the image to save and host yourself. Never rely on someone to host your image for you, it’s rude and takes up their space.
This applies as well to avatars.
Q: How do I make a rotating/cycling/changing signature?
A: A couple of hosts will give you the BB code to use multiple signatures that change when the page is refreshed. The one that I’ve seen most used is below:
http://signavatar.com/
Q: Can I make a rotating avatar?
A: Rotating avatars are not supported. There are no plans to implement this either. Please do not ask about this.
Q: How do I make a transparent background on an image for a signature or icon?
A: Most of the time, this is where an image editing program like Gimp or Photoshop is needed. You will need to cut the parts of the image away that you don't want and leave it on a transparent layer, and then save it in a format that supports transparency. The most used ones are GIF and PNG.
If you don't know how to do this, the online image editor linked earlier has a transparency tool that will cut everything of the same color away. For example, if you have a picture of a character on a white background, you can use the transparency tool to cut away all the white in one click, and save it out like that to be uploaded to your image host of choice.
Other than that, you may have to ask a GFX editor on the site to do it for you, but be aware they have the right to reject or charge you for the trouble. If the specified item you want cut out is on a "busy" background, they may have to spend a bit of time to get it to look good for you. Be respectful, and always remember that this is work that they're doing with their time!
Q: How do I get an image editing program? I don't have one!
A: You have a couple of choices here. Gimp is one of the preferred programs because it's free. There's no trial period, and you can jump in with some tutorials and get right down to work. Many people find Gimp confusing though, so remember that searching "Gimp Tutorial" on Google may be worth the time.
http://www.gimp.org/
There's also Adobe Photoshop. You can get a thirty day trial of the program from their website, but afterwards you will have to pay to use it. Adobe programs are highly expensive, because they are known for professional quality and generally easier to use with more options for brush customizations. Keep in mind, we will not help you get this program for free.
http://www.adobe.com/
Q: This is too hard! I just want to make a signature!
A: If you find this difficult, I highly suggest paying someone to make a signature for you.
Q: Where can I find villager sprites for my signature?
A: In this one situation, I'm not going to hand you a link. I would like for you to use google or ask others that have this who they got them from. There's a very good reason for this.
Anytime you use someone else's work for your signature, you are using their labor in your signature. Even if you paid for it here, you need to use a SOURCE in your signature! Some signatures will say the artists name on it, or some people have a nice "Thank you [artist]!" in small text. When it comes to using villager sprites, MOST artists want some sort of link back to their website, and you are REQUIRED to follow this rule for them!
So, I want YOU to find the source, and make sure you CREDIT the artist with a link back to their website, or their TBT profile under your signature. Alternatively, you can make your signature a CLICKABLE link IMAGE.
HTML:
[URL="http://i.imgur.com"][img]http://i.imgur.com/ZUhZIrZ.gif[/img][/URL]This is an example of what one looks like, and the code for it. The image is my signature, but the LINK leads back to IMGUR.com. You don't have to link back to your host, but if you didn't make it, you can always link back to that person's profile!
Last edited by a moderator:


") FC: 1234-5678-9101
FC: 1234-5678-9101 


