Freya_Druid
Living noob; dead expert
Continue onward if sewing patterns and Space Whale's are among your interests...
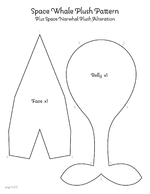
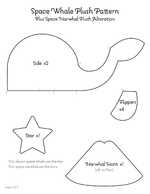
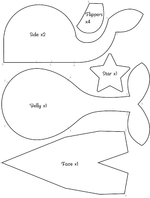
- mark out and cut pattern pieces:
- 1 x Face out of spacey fleece
- 2 x Side out of spacey fleece
- 4 x Flippers out of spacey fleece
- 1 x Belly out of lighter spacey (or water) fleece
- 1 x Star out of pale yellow fleece
- sew up center dart of Face
- hand fell Star to right side of Face; align bottom center in-point to top of Face dart.
- optional: add stuffing under Star before completing felling stitch attaching it to Face
- pin one side of Face to one Side from 0 marker to 1 marker; sew
- pin second side of face to second Side from 0 marker to 1 marker; pin Sides together from 1 marker to 2 marker; sew all pinned seams
- pin 2 sets of Flippers together and sew all sides except short flat one
- optional: thread mark light side pattern line to be visible from right side
- flip Flippers right side out and stuff
- pin Flippers to right sides of Sides 5 marked corner to 5 marker
- pin Belly to everything: start at 0 and 4 markers for alignment
- sew (recommend hand sewing as machine sewing will flatten the structural shaping of the tail)from 0 marker to 4 marker; for all of tail (markers 4 to 3 to 2 to 3 to 4) roll fabric back over a finger as you sew to maximize shaping
- flip right side out (remember to pull out tail flipper corners completely)
- mark where you want the eyes to be and install; you may have to cut a small slit (especially if you do no own an awl) to accommodate the eye shanks
- stuff
- optional: stuff tail flippers with polyfil then stuff the rest of the tail with weighted beads (this will help the final plush balance properly when sitting on a flat surface)
- sew the final seam (0 marker to 0 marker) with a ladder stitch

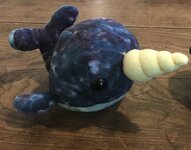
Another highlight of Space Camp Bell Tree was the incredible outpouring of camp fanart. If you were also captivated by @Cheremtasy 's Space Narwhal Plush (see above) then you may be interested in the following modifications of my construction notes that will allow you to create your very own Space Narwhal Plush.

 Prepare Narwhal Horn
 Attach Narwhal Horn
- mark out and cut 1 Narwhal Horn piece out of pale yellow fleece
- fold in half (right side together) then sew the small curves and straight edges
- turn right side out
- cut a length of floss (can also just use plain thread), knot 1 end, and use a tapestry or other large needle to thread the floss through the hollow horn and out the end of the small curved seam at the tip of the horn
- stuff horn
- run gathering thread along final unsewn seam at bottom edge of horn and pull taught (the bottom should nor be cinched but not fully closed)
- plot where the floss will cross the straight seam on underside of horn (approximately 3 points plus the base of the horn)
- wrap flow tightly around horn, securing at marked points with a single knotted backstitch (leave a little excess floss for final stage
- I attached the Horn in 'Finishing Touches' step to avoid having to handle the stuffed horn inside the plush while sewing and the challenge of flipping the plush with the horn already attached, specifically I waited until the plush was completely stuffed before attaching the horn
- use pins to mark out placement of Horn on Face
- ladder stitch the cinched base of the Horn to the Face piece, aligning the bottom seam of Horn to the very top of Face dart
- wrap the remaining floss around the base of the horn and secure with knotted backstitch (conceal tail end of floss inside plush)
Here are the materials I used to construct this guy. Please note that while I’ve provided links for everything all italicized items I already had in my stash and thus have linked to the closest match I could find. Also note that these links are all to a single US chain store that absolutely overmarks their products so do not feel bad about making the most of coupons and promotions if you do purchase directly from them!
Space Fleece
Belly Fleece
Yellow Fleece
18 mm Eyes
Stuffing
Technically Optional: Weighted Stuffing ~important for balancing the final plush. (see Q&A for more details)
Optional Temporary Fabric Pencil
Yellow Thread
Purple Thread
Optional: Yellow Floss ~only used for Narwhal horn; can be substituted with yellow thread
As I get questions I will update this section so ask away!
 What size should I print the pattern?
I have updated the pattern to accommodate printer margins so all you have to do is print it on standard letter size paper. Unfortunately this accommodation (and the addition of the narwhal horn) means that the pattern is now spread across 2 pages, however the original margin-less single page pattern is included in the 'Edits & Old Versions' tab. If you are interested in creating a larger or smaller Space Whale Plush the pattern is scalable, just remember to scale everything proportionately.
 How much fabric will I need?
If you aren't horribly fussy about pattern matching (like I was) then you can likely get away with 1/2 yard of the space fleece (at a 58" wide bolt), a minimum of 5 inches (about 1/6 of a yard) of the ocean or belly piece fleece, and you only need a 3” x 3” patch of the yellow fleece. (Provided you aren't changing the scale of the plush)
 Why is the weighted stuffing important?
While the weighted stuffing is not technically required for the construction of this plush, it is very important to the final balance of the plush when sat on a flat surface. Without the weighted stuffing the plush will fall forward unless propped up somehow, this is because the plush is top heavy in design and required the counter-weight to balance nicely unsupported. If you're on a tight budget or just don't mind having a forward flopping whale then the weighted stuffing is not necessary.
 What is this patterns seam allowance?
This pattern is drafted net, so that means that the pattern does not include any seam allowance. I did that so when you trace the pattern you will have an exact line to follow as you are sewing. You can also choose the exact amount of seam allowance you need to add based on your own preference and how much your fabric is prone to fraying (fleece isn't normally fray prone, but other fabrics like flannel are).
Note: I cut the pattern with approximately 1/4 inch seam allowance, except the star which I actually cut net. This is because the star was not turned and felled but merely felled down as-is. I could get away that that decision due to the fact that the yellow fleece I used doesn't seem to fray, however if you use a fray-prone fabric then you will need to turn over the edges and thus will need a seam allowance.
 What grain should I cut the pattern on?
I cut all my pieces on the straight grain (parallel to the salvage edge) according to the pattern orientation of my original pattern (see 'Edits & Old Versions'), however if you want to buy less yardage you can cut on the cross-grain to conserve fabric. Note that this will change the direction of the pile, however most fleece is not very noticeable in the directionality so that shouldn't be a problem.
 Why isn't the tail lining up?
You have just discovered the hardest part of this pattern! The tail end of the Belly pattern piece was drafted with a lot of extra ease to enable the tail to flop up and over in the final plush. This unfortunately means that it is a challenge to align the belly tail to the body tail. I recommend starting by pinning the corners (pinning perpendicular to the pattern lines will require more pins but also be more precise), then curl both layers of fabric back over a finger to align the pattern and pin. FYI: if you're anything like me then you will need a metric ton of pins.
I have updated the pattern to accommodate printer margins so all you have to do is print it on standard letter size paper. Unfortunately this accommodation (and the addition of the narwhal horn) means that the pattern is now spread across 2 pages, however the original margin-less single page pattern is included in the 'Edits & Old Versions' tab. If you are interested in creating a larger or smaller Space Whale Plush the pattern is scalable, just remember to scale everything proportionately.
If you aren't horribly fussy about pattern matching (like I was) then you can likely get away with 1/2 yard of the space fleece (at a 58" wide bolt), a minimum of 5 inches (about 1/6 of a yard) of the ocean or belly piece fleece, and you only need a 3” x 3” patch of the yellow fleece. (Provided you aren't changing the scale of the plush)
While the weighted stuffing is not technically required for the construction of this plush, it is very important to the final balance of the plush when sat on a flat surface. Without the weighted stuffing the plush will fall forward unless propped up somehow, this is because the plush is top heavy in design and required the counter-weight to balance nicely unsupported. If you're on a tight budget or just don't mind having a forward flopping whale then the weighted stuffing is not necessary.
This pattern is drafted net, so that means that the pattern does not include any seam allowance. I did that so when you trace the pattern you will have an exact line to follow as you are sewing. You can also choose the exact amount of seam allowance you need to add based on your own preference and how much your fabric is prone to fraying (fleece isn't normally fray prone, but other fabrics like flannel are).
Note: I cut the pattern with approximately 1/4 inch seam allowance, except the star which I actually cut net. This is because the star was not turned and felled but merely felled down as-is. I could get away that that decision due to the fact that the yellow fleece I used doesn't seem to fray, however if you use a fray-prone fabric then you will need to turn over the edges and thus will need a seam allowance.
I cut all my pieces on the straight grain (parallel to the salvage edge) according to the pattern orientation of my original pattern (see 'Edits & Old Versions'), however if you want to buy less yardage you can cut on the cross-grain to conserve fabric. Note that this will change the direction of the pile, however most fleece is not very noticeable in the directionality so that shouldn't be a problem.
You have just discovered the hardest part of this pattern! The tail end of the Belly pattern piece was drafted with a lot of extra ease to enable the tail to flop up and over in the final plush. This unfortunately means that it is a challenge to align the belly tail to the body tail. I recommend starting by pinning the corners (pinning perpendicular to the pattern lines will require more pins but also be more precise), then curl both layers of fabric back over a finger to align the pattern and pin. FYI: if you're anything like me then you will need a metric ton of pins.
Special thanks to:
 @Mick for being a fabulous co-cabin leader, and of course for creating the original Space Whale Plush collectible

 @Kitsuragi for encouraging me to cross post my pattern from our crew quarters
 @Aquilla for asking wonderfully insightful questions (that I fully overlooked) and being the first to implement my pattern
 @~Kilza~ @Halloqueen @Vsmith @Iris_T @S.J. @kayleee @Bui @Snek and @Bluelady for encouraging me to go for it and create this pattern in the first place
 All of my fellow International Space Cetaceans for being wonderful teammates and making this event truly an experience to remember!
Last edited:
